

I keep getting asked to put up some pictures and a bit of a build diary from when we built it. This car was put together way back in 2008. So please bare this in mind. Many of our manufacturing methods have changed somewhat. It still makes for a good read:
Something I have had in for a couple of weeks now. I don’t post any pictures of customers cars usually, however this is my brothers car, and he does not mind me putting up and keeping updated a post.
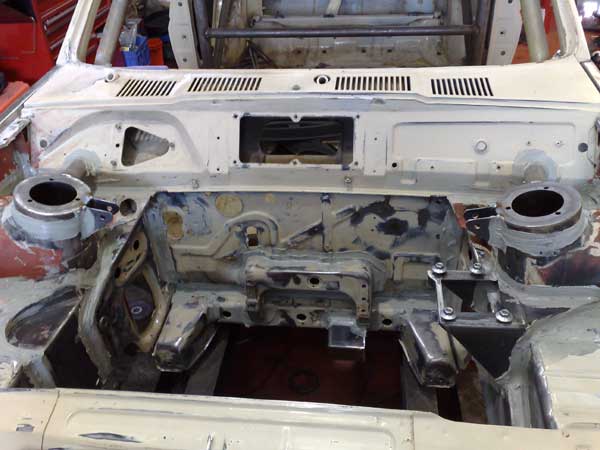
Basically he bought the car a couple of years ago as a 950 beige popular. The basic shell is very solid, the only spot of rust being on the scuttle panel. It also had a dented door.
He started by removing the interior, and buying a full weld in cage. This was started, unfortunately other things have kept him from completing the project. The ST170 engine and box was also purchased.
Thats when the car ws brought to me,

So anyways:
First thing to do was to start measuring up the engine and box to see where I could get away with mounting the engine:


This is the most difficult part of any build such as this one,
Its important to keep the engine as low and as far back as I dare. It’s also important to try and keep the weight balance as central as possible. The amount of car’s I have seen with engine transplants, especially Mk1’s, that move the whole engine and box over to the nearside is quite shocking!! ![]()
Right, so it was clear that a whole set of engine mounts needed to be fabricated and mounted to the shell. I’ve opted to use the ST170 mounts, for ease of use in the future.
My brothers original plan was to use an IB5 and had cut out the chassis leg to use a fiestacentre kit. I replaced the now missing steel:
 This is the cradle I made to mount the gearbox onto the chassis leg:

Welded in and completed nearside:
 The offside also uses the standard ST engine mount, I had to fabricate another mounting for the mount on the inner wing:

I cut back the chassis leg and re-inforced it with 3mm steel, to ensure ease of belt changing in the future, it also helps strengthen the mount:

Some of you may have noticed the strut tops changed over through those photographs. I changed the original rubber top mounts for some eccentric bearing mounts:
Action Shot!

Removed:

Newly fabricated strut tops being welded into plate:

So, lets see the engine now in:


There is Jenvey 48mm throttle bodys mounted to the engine.
Ok cool, basic engine fitting now done. I’m planning on this car really sticking to the black top, so some suspension upgrades now. None of the usual polybush stuff here I’m afraid! ![]()
Set of speedlines for starters:

They are now wrapped in Proxes.
There are no decent front suspension setups available fot the Mk1 off the shelf to my knowledge. So we have gone for a set of Leda’s.
Custom lower arms, They use M14 rose joints for all moving joints:

I made new crossmember mountings to mount the rose joints properly:

I reconditioned the front hubs:

The head has now gone off for three angle valve seats and porting & polishing. You can also see here I have brought the cage through the bulkhead to the strut tops:
The wheels tyres and arch kit have now been fitted:

The gear selector and cables are now fitted, quite snug to be honest:

A view of the cables onto the box:

Moved on this morning by cutting out the front crossmember, to allow extra room for the exhaust manifold. I think with careful modifying of the manifold I could have got away with it, but I would prefer to allow a bit of extra room.

While I had the welder out, we removed the fuel filler cap:

I also seam welded the front of the vehicle, using the old favourite, weld an inch, miss an inch:

I also added on the brackets to the strut tops which will mount the front strut brace. This picture shows this, plus all the seams and joints now sealed:

Whilst waiting for the sealer to dry, I started to rework the rear arches to allow room for the wheels and tyres.

I cut away about 2″ of the arch, and inner arch to suit. The piece of zintex steel you see sticking out is joining the two panels. This will be cut down once I have finished welding it. It is spot welded slowly to ensure minimum panel damage.
 I then stonechipped some of the engine bay:

Followed by a couple of coats of etching primer: (Notice the invisible breathing aparatus. ![]() )
)

And a few coats of the final colour matt black.

The vehicle is to be fitted with 4-Pot wilwoods all round, so I needed to sort a method of getting a rear hub to fit. I thought initially that an ERST rear hub would fit, but unfortunately they are too long. We therefore had to look into another option. The option we took up was to turn down the standard drums to leave us with two hubs to mount the disks on:

So the front of the car is now completely painted and ready for components to be bolted in for good now. The cylinder head is still not back yet, but I went down to the machine shop today and it’s looking pretty good. The inlet ports have been opened out to suit the inlet manifold we have. The polishing was being done when I was there. I should see the return of the head on Wednesday, which means the engine can be fitted for good then.
Spent the day completing the roll cage:


The paint has gone great on the front wings. My brother was happy with it, but I was not. Fortunately the rest of the car is going to be painted tomorrow, so I can repaint the front wings at the same time. ![]()
I spent most of the day joining the inner and outer skins on the rear arches, and making the rear quarter look sensible where we welded it over.
I did get a few fun things done though! ![]()
I commissioned a new fuel tank and swirl pot along with a few other bits and pieces, my good friend James from JEK popped over to give me a stiff one. He also put together a few nice bit’s and pieces for me:
A mock up of the fuel tank in position:
 I also put together a few mock ups of the lift pump, filter and pressure pump:

Also made a mock up of the battery tray:

One of the issues with using the blacktop engine is reversing the water pump. Since I first saw it done I didn’t like the idea of reversing it. In the USA ford racing even made the part. I however am not planning on reversing it, but keep it rotating in the same direction, using an extra idler pulley.
We decided on using a smaller alternator anyway, to save as much drag on the engine as we could. We opted for a small Denso item.
This came with a single ‘V’ pulley though, as opposed to the multi’V required by the blacktop engine.
A picture of the new alternator on the left, and the old one on the right, both with drive pulleys removed:

You can see the new alloy drive pulley we made up to fit the new alternator.
A view of the new alternator with new drive pulley fitted:

I have had a fairly busy day today, I’ve been getting the paint finally sorted. ![]()
I stone chipped the inner wheel arches, and the floor of the car.
I then primed the whole lot again:

Then on went the matt black. I wasn’t sure about it to start with, but it actually looks pretty cool! ![]()

Wasnt sure at first, but yeah, looks wicked!

Now all the crap work is done, the interesting stuff can happen, and it has been! ![]()
Firstly this morning, I went about modifying the clutch to be hydraulic rather than cable. I’m using a wilwood master cylinder. I started by making a small pivot out of mild steel, with a thread for the master cylinder, I also strengthened up the pedal and made the ‘output’ on the opposite side:

I then went about making the master cylinder fit the actual pedal box:
 Fitted to the car:

I also finished modifying the bias pedal box and fitted that at the same time:
 I then moved on to fitting the front suspension, including the Leda’s. You can see the brackets I had machined up to locate the 4-pot wilwood calipers:

A view fitted:
 James from next door, JEK, strengthened up the gearbox mount for me too, from where I had modded it:

Perspex windows fitted:

The head was returned today too, I’m real pleased with it. He’s done a fantastic job of opening out and matching the ports:

Got the engine built up today, and managed to get it in for the last time, for a while anyway!

Anyways!
The arches have now been painted and fitted:
I’ve also installed the whole braking system now.
 Including a custom handbrake cable and brakets for the rear wilwoods:
 A quick one of the TB’s now ready to rock & roll:
 I have also now fitted the rad, we needed to make some brackets to hold it in properly and remove the OE ones to make it sit as far forward as we could. It’s about as big as I think will fit, so hopefully enough, I also fitted the fan:
 One front seat now fitted, this isn’t the actual type of seat that will be fitted, but its one we had hanging around, so will be used for mapping ect:
 I then uploaded a basemap and settings we had used on a previous Zetec:
 I’m planning on getting the driveshafts sorted first thing this morning, then onto the Dyno for mapping!
 ![]()
Hopefully we will see some figures by the weekend.
A fibreglass bonnet and bootlid have now also been ordered.
More updates soon:
Well, not been much going on of late tbh, however the fibreglass bonnet & boot have turned up finally. Absoloutely top notch, very pleased with them! The new headlights are also in, some Mk1 golf ones. Plus the doors are painted, the makralon windows fitted, and fitted to the vehicle.
